Introduction
When I started working on Dell Boomi on one of our projects, I soon found out that it does not allow us access to the source code. Therefore, it becomes difficult to set up the CICD (Continuous Integration Continuous Deployment) of Boomi applications, as the conventional CICD process starts when someone merges code into the source repository. This code is then compiled and deployed to a runtime environment. Since I didn’t have access to the source code, I needed to develop a workaround to automate the deployment.
Thankfully, Boomi allows you to interact with the platform through the Atomsphere API (Application Programming Integration). This API consists of a large set of operations, including most of the operations accessible via the UI. So, I thought of leveraging the Atomsphere API in conjunction with Azure DevOps to set up the automated deployment of Boomi applications. This blog will talk about the setting up of the automated deployment for Boomi applications.
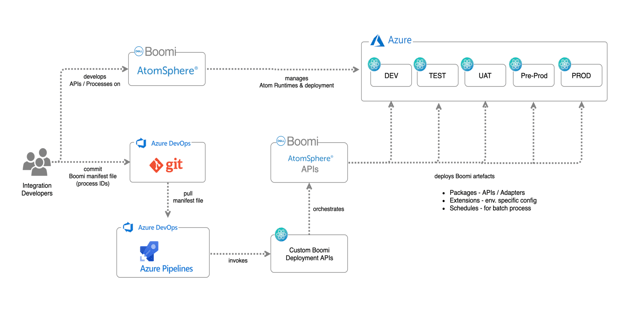
Below is the overall flow that developers should follow once this automated deployment is setup.

Boomi Deployment Automation API
Deployment Automation API is something I created with the following rationale:
- Multiple requests (one for every process in an application) could be sent to Atomsphere API by triggering one call from Azure DevOps. This is mainly to construct the whole application as a package rather than considering every process as a different package.
- Unexpected errors could be handled in this layer rather than Azure DevOps, meaning only exception information is sent back to Azure DevOps.
Deployment Automation API operations
createPackage
This endpoint receives requests when the build pipeline is triggered. This operation sends multiple requests to Atomsphere API, and creates packages of the listed components with the same package version number as the build.
deployPackage
Once the package is created, it's then time to deploy the packages in different environments. This endpoint receives the request when a release pipeline is triggered. It then sends a request to Atomsphere API for each component ID in the pipeline.
Leveraging Atomsphere API
I used the following Atomsphere API endpoints:
- Packaged component Object: https://help.boomi.com/bundle/integration/page/r-atm-Packaged_component_object_66fa92c8-948f-46c6-a521-3927ab431c84.html
- Deployed Package Object: https://help.boomi.com/bundle/integration/page/r-atm-Deployed_Package_object_897b5068-6daa-44e4-bf04-7e25385157a8.html
Azure DevOps
Please follow the below steps to set up the Azure DevOps side of the things:
Create the Repository
- Login to Azure DevOps and create a repository.
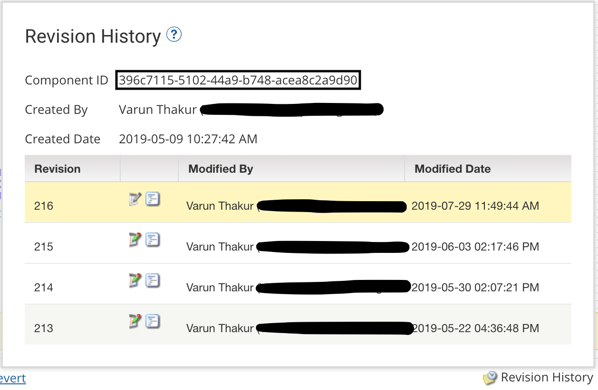
- Create a JSON file which will contain the component IDs of all the deployable component in your array. Include component IDs of the deployable component and not of any sub-process, connections or any other shared components.
Check the revision history of the components for component IDs, as shown in the picture below:

Create the Build Pipeline
- Login to Azure DevOps and create a build pipeline.
- Select the repository created in the previous section as the source.
- Add a task to send a request to the Boomi Deployment Automation API's createPackage operation. The request message consists of a JSON payload that contains the build number of the build pipeline and the array of component IDs retrieved from the repository.
Create the Release Pipeline
- Login to Azure DevOps and create a release pipeline.
- Select the corresponding build artifact as a source to this release pipeline.
- Add a new task which sends a request to the Boomi Deployment Automation API's deployPackage operation. The request message consists of a JSON payload which contains the build number, targetEnvironmentName and the array of component IDs retrieved from the repository. This task will be added to each stage which in turn corresponds to different testing/production environments.
Step by step guide once setup is finalised
New Boomi application
- Create your Boomi application.
- Create the JSON file containing the component IDs and add it in the newly created repository.
- Create the build and release pipelines.
- Trigger the build pipeline to create a new package of the components mentioned in the manifest file.
- Trigger the release pipeline to deploy the new package of the components in Boomi environments.
New deployable components in Boomi application
- Add the new deployable component IDs to the JSON file.
- Trigger the build pipeline to create a new package of the components mentioned in the manifest file.
- Trigger the release pipeline to deploy the new package of the components in Boomi environments.
Updates in the existing components
There is no need to update the repository with anything in this case. Follow the steps outlined below for the updated code to be deployed in required environments.
- Trigger the build pipeline to create a new package of the components mentioned in the manifest file.
- Trigger the release pipeline to deploy the new package of the components in Boomi environments.
Conclusion
Automated Deployment of Boomi applications is possible using the Atomsphere API, a custom Deployment Automation API and Azure DevOps (or any other DevOps tool). This approach helps in the following:
1. Allows to package applications as a whole rather than individual processes.
2. Keeps track of deployed package versions in Azure DevOps.
3. Streamlines the process of promoting Boomi packages to higher environments.

