
Introduction Overview
Azure Data Factory (ADF) is Azure's cloud ETL service for scale-out serverless data integration and data transformation. It has a code-free UI with many maintenance-free connectors, allowing it to be maintained by non-coders. No matter how much or little code is needed for the ADF, it is still important to have multiple environments for deployment, ensuring the production ADF is in a secure consumption-ready state, meaning Continuous Integration/ Continuous Delivery (CI/CD) is essential. Something that I have observed is that while there are documentation and guides provided on how to implement ADF CI/CD, most of them only document the process by using the classic editor, rather than through YAML pipelines, which can be seen in Microsoft documentation here.
Through this post, I will try to explain and show the process through YAML, which is the newer and recommended way of working. This will allow for easier collaboration in teams (allows for code reviews, pull requests, and in-code comments), and easier to compare versions/ revert to previous versions. This post will not go through Azure platform resource deployments, only the deployment of ADF resources, such as the data pipelines, datasets, and data flows.
Implementation Overview
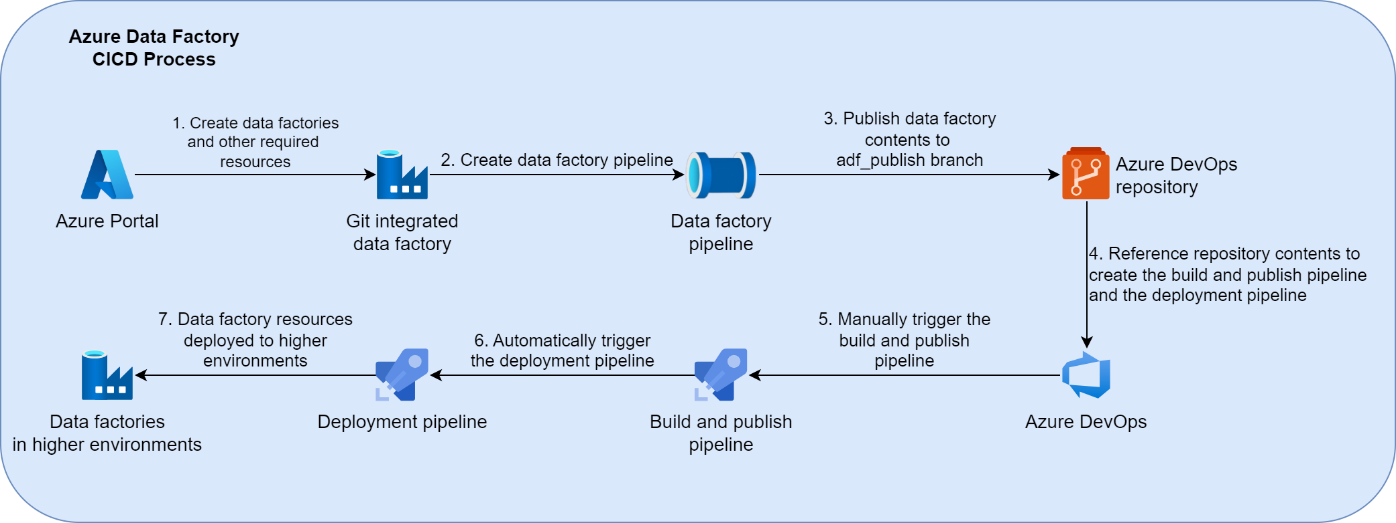
The process of ADF CI/CD consists of two separate pipelines. The first pipeline will build and publish the code of the Git-integrated ADF, usually integrated with the development environment. The second pipeline will be a release pipeline that follows from the first pipeline, where it deploys the Azure Resource Manager (ARM) templates and parameter files to higher environments. The entire flow, from the creation of resources to deploying to higher environments, can be seen in the diagram below.
Pre-requisites
- All Azure resources required are already deployed.
- The development instance of the ADF should be Git integrated.
- Git integration should be done with Azure DevOps.
- Pipelines used for CI/CD should be hosted on Azure DevOps.
- A service principal will need to be created for the subscription you are deploying to.
- Self-hosted integration runtimes (IR) should have the same name across all environments.
Git Integration
Git is the industry standard for code versioning, and is highly recommended to be used with the ADF for the following reasons:
- It is essential for creating an automated CI/CD process.
- Reverting to previous versions will be easier.
- Removing large amounts of content/ renaming values is easier by directly editing the JSON file.
Git integration will provide the ADF in the linked repository of choice via JSON files, consisting of many parameter files and ARM templates. Do note that ADF only supports Git integration with Azure DevOps and GitHub Repositories.
By default, an adf_publish branch will be created, where any changes and updates published will appear in the adf_publish branch. The branch name for publishing can also be configured to a different branch name.
The pipelines to deploy the ADF resources should be situated in the main branch, as adf_publish should only capture the changing aspects of the ADF.
Build and Publish Pipeline
The build and publish pipeline will build and publish all the contents of the ADF that is Git integrated. This will checkout and publish all the build artifacts in the adf_publish branch, allowing the contents to be consumed in the release pipeline. A sample snippet of the code can be seen below.
trigger: noneresources:repositories:- repository: adf-publishtype: gitref: adf_publishname: '<Project Name>/<Repository Name>'jobs:- job: PublishDataFactorydisplayName: Publish Data Factorypool:vmImage: windows-2019steps:- checkout: adf-publishpath: publishfetchDepth: 1- task: PublishBuildArtifacts@1displayName: 'Publish Artifact: drop'inputs:PathtoPublish: adf-dev-sample
Release Pipeline
The release pipeline deploys the ADF to environments such as test and production through a series of stages. As there are no changes needed after the build and publish pipeline has run, it can be set to be triggered upon completion of the build and publish pipeline. The sample code snippet below displays how each stage calls the template YAML file to deploy the resources, with parameters specific to each environment.
name: data-factory-release-pipeline-$(Build.BuildId)

trigger: none

variables:
- name: serviceConnection
  value: '<Your service connection>'
- name: subscriptionId
  value: <Your subscription id>
- name: resourceGroup
  value: 'rg-tst-sample'
- name: dataFactory
  value: 'adf-tst-sample'

pool:
  vmImage: ubuntu-latest

resources:
  pipelines:
  - pipeline: adf-build-and-publish
    source: adf-build-and-publish
    project: <Project Name>
    trigger: true

  repositories:
    - repository: adf-publish
      type: git
      ref: adf_publish
      name: '<Project Name>/<Repository Name>'

stages:
- stage: DeployToTest
  displayName: DeployToTest
  jobs:
  - template: templates/data-factory.release.template.yaml
    parameters:
      azureSubscription: $
      subscriptionId: $
      environment: 'test-environment'
      resourceGroupName: $
      dataFactoryName: $
Template File
The template YAML file contains three main jobs which deploy the actual ADF, the pre-deployment step, the deployment step, and the post-deployment step. In this section, I will go into detail about each of the steps. The code snippet for the template file can be seen below.
parameters:
  - name: azureSubscription
    type: string
  - name: subscriptionId
    type: string
  - name: environment
    type: string
  - name: resourceGroupName
    type: string
  - name: dataFactoryName
    type: string

jobs:
  - job: PreDeploymentScript
    displayName: 'Disable Triggers'
    pool:
      vmImage: 'ubuntu-latest'
    steps:
    - checkout: adf-publish
      path: publish
    - task: AzurePowerShell@5
      displayName: 'Azure PowerShell script: Pre-deployment'
      inputs:
        azureSubscription: $
        ScriptPath: '$(Agent.BuildDirectory)/publish/adf-dev-sample/scripts/PrePostDeploymentScript.ps1'
        ScriptArguments: '-armTemplate ''$(Agent.BuildDirectory)/publish/adf-dev-sample/ARMTemplateForFactory.json'' -ResourceGroupName $ -DataFactoryName $ -predeployment $true -deleteDeployment $false'
        azurePowerShellVersion: LatestVersion

  - job: Deployment
    displayName: 'Deployment'
    pool:
      vmImage: 'ubuntu-latest'
    dependsOn: PreDeploymentScript
    steps:
    - checkout: adf-publish
      path: publish
    - task: AzureResourceManagerTemplateDeployment@3
      displayName: 'ARM Template deployment: Resource Group scope'
      inputs:
        azureResourceManagerConnection: $
        subscriptionId: $
        resourceGroupName: '$'
        location: 'Australia East'
        csmFile: '$(Agent.BuildDirectory)/publish/adf-dev-sample/ARMTemplateForFactory.json'
        csmParametersFile: '$(Agent.BuildDirectory)/publish/adf-dev-sample/ARMTemplateParametersForFactoryTest.json'
        overrideParameters: '-factoryName $'

  - job: PostDeploymentScript
    displayName: 'Enable Triggers'
    dependsOn: Deployment
    pool:
      vmImage: 'ubuntu-latest'
    steps:
    - checkout: adf-publish
      path: publish
    - task: AzurePowerShell@5
      displayName: 'Azure PowerShell script: Post-deployment copy'
      inputs:
        azureSubscription: $
        ScriptPath: '$(Agent.BuildDirectory)/publish/adf-dev-sample/scripts/PrePostDeploymentScript.ps1'
        ScriptArguments: '-armTemplate ''$(Agent.BuildDirectory)/publish/adf-dev-sample1/ARMTemplateForFactory.json'' -ResourceGroupName $ -DataFactoryName $ -predeployment $false -deleteDeployment $false'
        azurePowerShellVersion: LatestVersion
- Pre-Deployment Step
The pre-deployment step ensures that the ADF being deployed is in a ready state, as there are conditions that need to be met to ensure a successful deployment. The main target of this step is to disable the triggers in the environment being deployed, as changes to any active triggers will fail during deployment. This is achieved by using the PowerShell script, PrePostDeploymentScript.ps1, provided by official Microsoft documentation here. The documentation and the sample code snippet should also include all the arguments needed for the script, but the key thing to note is that the -predeployment parameter is set to true.
- Deployment Step
The deployment step deploys all the resources to the ADF in higher environments. It will rely on the ARM templates and parameter files that have been built and published by the “Build and Publish” pipeline.
- Post-Deployment Step
The post-deployment step is very similar to the pre-deployment step. The only difference is that the -predeployment parameter is set to false. This step will ensure all the triggers in the environment being deployed are started up again so that the ADF is ready for consumption.
Parameters
Parameter files are generated only for the environment which the ADF is Git integrated. The primary parameter file used is the ARMTemplateParametersForFactory.json file. Global parameters are not added in the ARMTemplateParametersForFactory.json file by default. But this can be done by ticking the “Include global parameters in ARM template” box as shown in the image below.
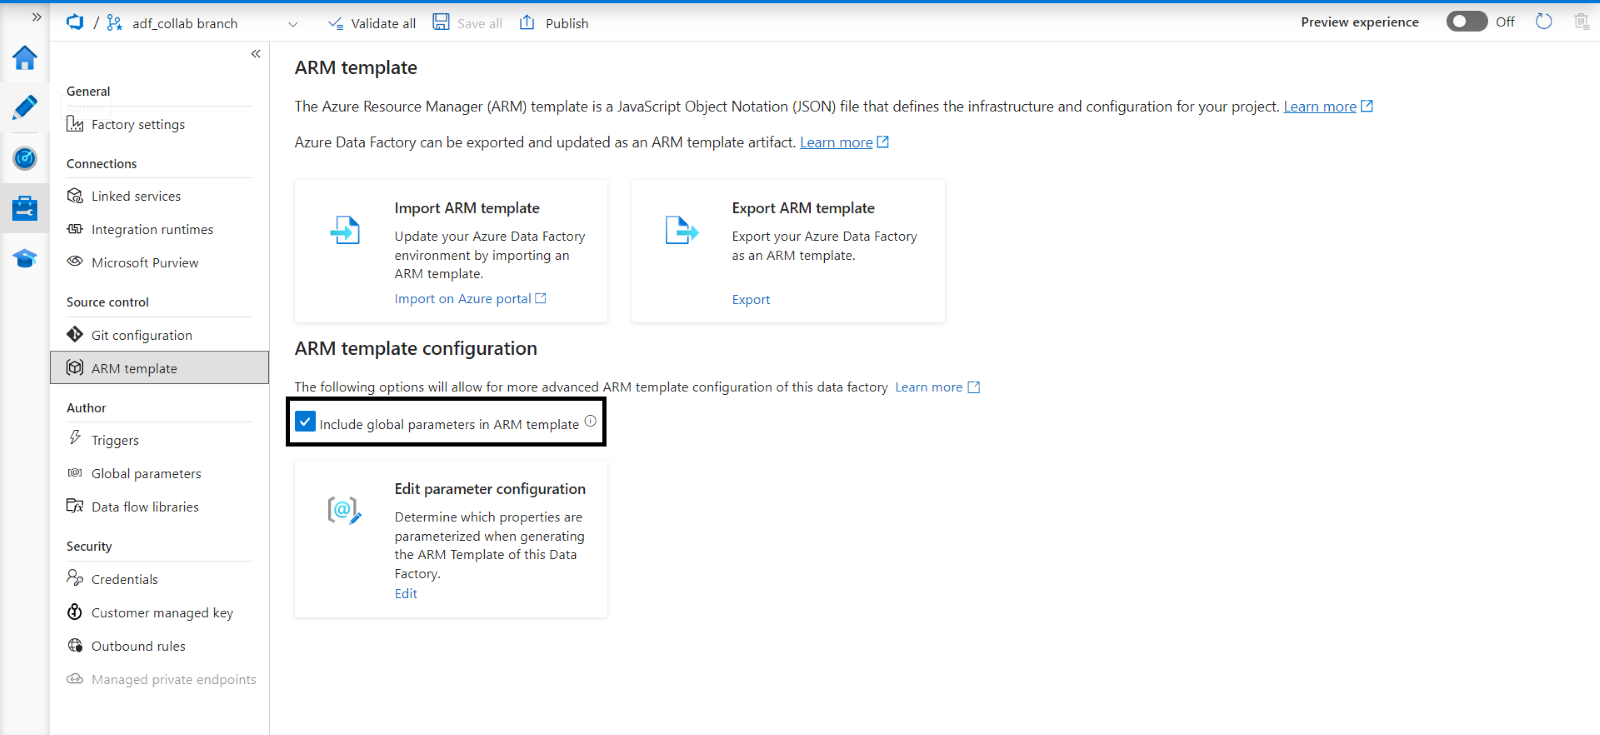
This is an action I recommend, as it means there are fewer steps required with parameter deployment and fewer files to maintain.
To ensure higher environments are being deployed with relevant parameters, you can either use the “overrideParameters” argument for each parameter or create multiple parameter files specific to each environment. I recommend the latter as it allows easier maintenance of the parameters. Additionally, if further environments need to be created, it allows easier and faster creation of a new parameter file to reference.
Points to Consider
- In the event of using a self-hosted integration runtime (self-hosted IR), the name should be the same across all environments, as the ARM template generated stores the name directly inside the template. That makes it very hard to parameterize the self-hosted IR name
- Alerts are not in the ARM template generated by the ADF, so these will need a separate template created, and another step in the pipeline to deploy.
Wrapping Up
Hopefully, this post has outlined the simplicity of ADF CI/CD and has encouraged you to implement it through YAML pipelines rather than through the classic editor. Despite seeming like there are more things and steps to consider, the result is much easier to read, easier to reuse, and a lot more satisfying to see work!