Data retention has become a crucial topic over the past few years, with organisations continuously exploring better ways to define and implement secure processes that cater to their needs. This becomes increasingly difficult when most of our data is stored/generated in the cloud, hence, requiring a flexible and innovative approach towards managing our data assets.
In this article, we will iteratively create an architecture for a data archival pipeline solution for application log events, leveraging some of the core services offered by AWS, like Elasticsearch (ES). This pipeline will serve as our source of truth for storing service usage and access data which is critical for audit purposes, especially when validating risks posed by unauthorised access of data or systems over a period of time. Some of the major factors that will drive our design decisions are:
- Flexibility: Our architecture should be generic enough to replace one service with another (possibly vendor agnostic) without breaking.
- Fault Tolerance: Ensure that our pipeline can manage failures or downtime efficiently.
- Non-Repudiation: We need to provide a level of guarantee that no one has tampered with the data being archived, by capturing a true snapshot of our stored data at any point in time.
Some of these factors are managed for us by the platform itself, with the rest requiring a more customised approach. So, lets begin…
Existing Setup
To start this process, we will make use of AWS ES to serve as my primary point of contact, storing log data generated by my VPC, ELB, Cloudtrail, WAF, etc. This means that the data in ES can be directly analysed for faults and other metrics involving our in-use services. For storage purposes, we will use a common naming scheme for our indices, for example - “logdata-DDMMYYYY”. This will allow us to search for and analyse data for a specific day, enabling further breakdowns if necessary.
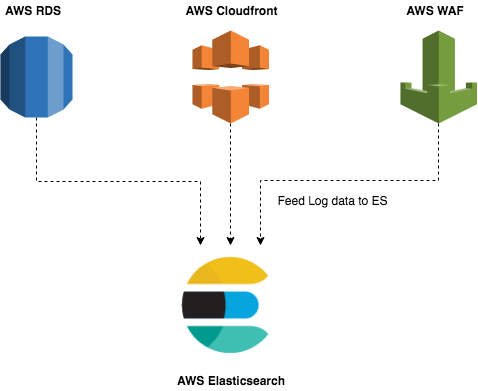
Note: The architecture being proposed in this article will be deployed in a Virtual Private Cloud (VPC), and will be created and maintained using Infrastructure as Code (IaC) like Terraform.
First Iteration: Initial Building Blocks
Now that we have a single source of truth established, we need to make sure that our data is retained for a certain duration (let’s say 5 years). This should enable our Security team to look back in time in case any vulnerabilities are discovered and assess the level and duration of impact. Some of the core benefits from this would be:
- Track Exposure: This should enable us to verify as to when the vulnerability was introduced into our systems and the level of penetration it created in our entire setup.
- Assess Impact and Risk: Going over historical data would enable us to understand the risk imposed by unauthorised access better, thus, aiding in identifying the most apt mitigation strategy we need to employ.
- Meet Compliance: Depending on our geolocation, we may have to meet certain data retention and management criteria to comply with government and organisational policies.
Now that we are ingesting a growing footprint of data, we need to balance our historical viewing needs with the capacity of the cluster. Thus, snapshots come into play.
Snapshot Creation And Management
Snapshots in ES are a backup of a clusters data and state (such as cluster settings, node information, index settings, and shard allocation) and provide a convenient flow to migrate data across AWS ES service domains. They can also be used to recover from failures by restoring data from the snapshots taken through AWS ES or a self-managed ES cluster, making it a highly flexible service for log management. However, there are version incompatibilities across the ES domains (may it be AWS or an Elastic managed one), so if we have an old ES cluster, migration to a newer version of ES might require us to pass our data through multiple ES versions that are compatible with each other. Each migration re-indexes the data to its own version until we achieve indexing that is compatible with the latest version, at which point we can feed our data to the latest version of ES out there.
Since AWS ES provides the option to set automatic snapshots at a specific time, we can utilise this to retrieve and restore our data as needed. However, there are restrictions to what we can do with automated snapshots such as not being able to shift to new domains, so in our instance we need a more customised snapshot solution. Our use-case requires us to perform manual snapshots by registering a repository to store to (like AWS S3) and then triggering it using the _snapshot/<snapshot-repo-name> endpoint with either cURL commands, a python client, or something else like Curator. Curator is said to be compatible with some versions of AWS ES for index and snapshot management purposes, so it may be applicable if we are using a compatible version.
In this instance, we will use our custom python client running on a RHEL-based EC2 instance, which will register an S3 snapshot repo on ES one-time-only, and then trigger ES to start taking a snapshot of its data. A few points to note here, though:
- We can take a snapshot of everything in ES initially then make incremental snapshots of the rest of the data on a periodical basis. For the purposes of this article we will be doing daily snapshots.
- A snapshot includes only those data that are in ES at the time of the snapshot invocation call. Any data that is fed into ES after the call will not be included in that snapshot and will require a separate snapshot trigger.
- ES has an IAM role that allows it to access the S3 bucket.
- The EC2 instance has an IAM role to access the S3 bucket (set to private access only).
Considering that we have access to Lambdas on AWS with support for python, we will stick to an EC2 instance for reasons that we will delve into later in this article. Creating a snapshot in ES can take a while to finish depending on the amount of data, so we may have to wait for a few minutes and then check our S3 bucket. when the snapshot process is completed, we can observe that there will be multiple objects in our S3 bucket rather than one single object containing all the data. Each of those objects represent the metadata information of the ES cluster or the indexed data stored in ES. Now, if we want to archive these data, we can set up a lifecycle policy on our bucket to retain the data for a few days or months, and then shift it into AWS Glacier for the next few years. Thus, effectively managing our data as required in our Data retention Service Level Agreement (SLA) or to remain compliant with government standards if any.
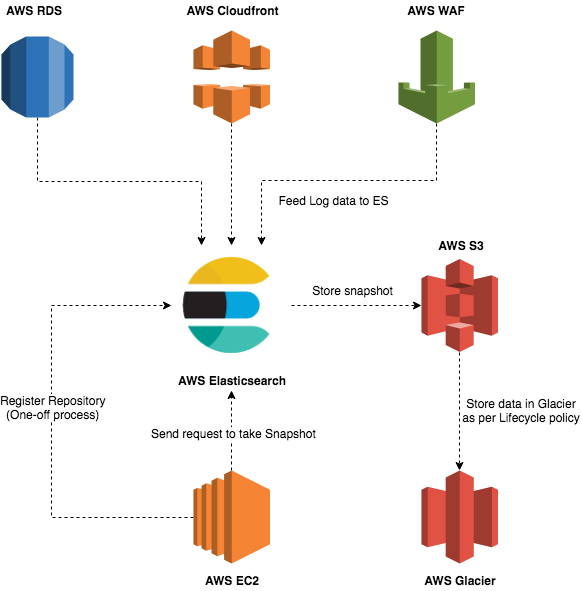
This workflow can easily be automated by setting the python script for triggering snapshot creation and storage as a CRON job. If the security team wishes to retrieve log files for the past 7 months or a few years (within the SLA limit), they can do so directly from Glacier and feed it back into a compatible ES or a supported tool.
Second Iteration: Add Non-Repudiation
Now that we have a working pipeline for ES, it is time to add a flair of non-repudiation to it because Security teams love data that has a tamper-proof guarantee. In order to facilitate this, we still have another level of complexity involved as we will see in the following sections…
S3 Bucket Design Decisions
Looking at our current architecture, we can see that our snapshot data is being stored in an S3 bucket with a lifecycle policy for archival into Glacier. To add non-repudiation to these data, we can perform a couple of things here:
- Encrypt the data in the S3 bucket and store it back into the same bucket but a different folder, OR
- Encrypt the data in the S3 bucket and store it in a separate S3 bucket.
Regardless of which option we pick, we will need to consolidate all the separate objects in the S3 bucket because ES gives us a snapshot consisting of individual files representing the data and the cluster config as previously noted. Encrypting these objects individually is complicated and unnecessary, so consolidating seems logical. Also, where do we store the data? Is it better to store the data in the same bucket or is it more preferable to separate concerns and place the encrypted data in a separate bucket? Personally speaking, we prefer a separate bucket for this because it helps in differentiating between states of the objects we are using. This also aids in limiting the amount of errors that may take place due to multiple objects being created for each snapshot.
Note: Amazon limits bucket creation to 100 buckets per account, following which we need to reach out to Amazon to increase the limit on our account.
So, following due process of creating an S3 bucket and an IAM role to access that bucket using the EC2 instance, our architecture would look something like this:
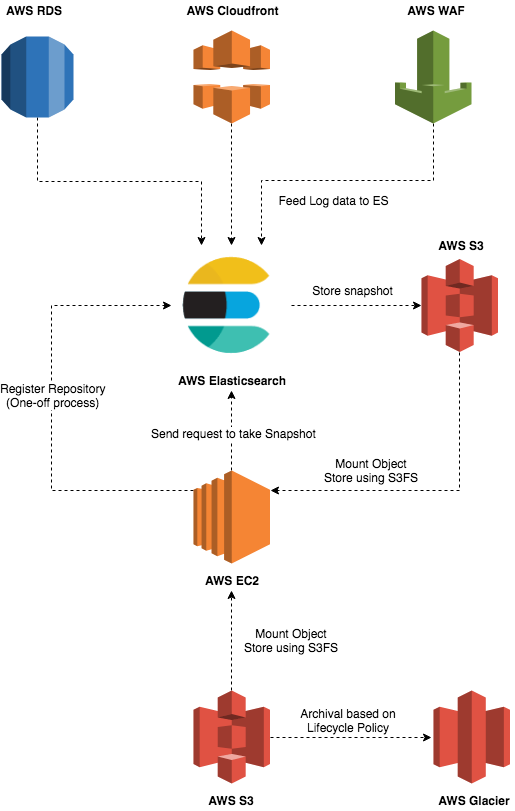
The current workflow stores snapshot data into our first S3 bucket, acting as a staging area for our log data, following which we will access the objects in that bucket, encrypt them, and place the encrypted data into our second S3 bucket, which will maintain the lifecycle policy of migrating the objects to Glacier. Sounds simple? Well, how should we get the data from the first S3 bucket for encryption? Do we use a Python client to connect to our S3 bucket and download the data? do we use a cURL command to access the data instead? do we use the S3 CLI for this? Or is there anything else that we may be able to use that better suits the structure of our snapshot data? Also, how can we automate this process?
Data Retrieval From The S3 Buckets: S3FS
Thinking about data retrieval from the S3 bucket led me to a software interface called Fuse, or S3FS to be more specific. It allows us to mount our S3 bucket(s) onto the EC2 instance directory and access the objects in it as if they were part of a hierarchy in our local file directory. By installing S3FS on my Virtual Machine (VM), we can use commands like ls, cd, etc on my mounted bucket(s). This enables us to access the unencrypted objects and consolidate them by creating a tarball or a zip file of all the objects in the bucket, and store it temporarily in the EC2 instance locally. This is a much more preferred approach as opposed to the S3 CLI given the file/object structure of our snapshot as the snapshot files do not have specific naming conventions that we may lock onto. Also, to consider an edge case where a snapshot has not been shifted to our second S3 bucket due to an error, we may potentially end up consolidating multiple snapshots together thinking it to be single snapshot. Therefore, consolidating the numerous objects for a single or multiple snapshot(s) in our bucket using automated CLI calls might end up becoming tricky, whereas, S3FS provides a cleaner approach to this coupled with a bit of simplistic bash scripting magic.
After installing all the dependencies for S3FS on the VM, we can run S3FS as follows:
s3fs <name_of_s3_bucket> ./path/to/our/directory -o iam_role="auto",umask=0022Since we are using an IAM role for this, we set the iam_role param to “auto” and updated the permission for files using umask to “0022”.
Note: Due to the eventual consistency limitation of S3, file creation may occasionally fail. S3FS does perform retries for such occasions but it is still non-deterministic and may need to be handled in our client application.
Applying Non-Repudiation To Data-at-rest
After consolidating our snapshot objects, we need to provide non-repudiation of these data so we compute a checksum of the tar/zip file using the shasum command, and tar/zip it with the relevant consolidated data file. To add to this, we further encrypt the new tar/zip file with PGP (using our public key) to reinforce our claim for non-repudiation and store the encrypted data in the second S3 bucket after mounting it on our EC2 instance with S3FS. This will retain our data in the second S3 bucket for a set time and trigger the lifecycle policy on that file for archival into Glacier. The data in the first S3 bucket is wiped out and the bucket is dismounted. Now, whenever our Security team needs to access these data, they can retrieve it from Glacier, decrypt it with their private key, verify the contents of the file with their consolidated checksum, then verify that checksum with a newly calculated checksum of the data file, un-tar the data file, and feed it into a valid ES cluster or a compatible tool for analysis. Thus, bringing about an interesting end to a somewhat interesting problem.
Third Iteration: Automation Assemble!
Automate EC2 Usage
Given that we will only run one snapshot request per day in this solution, we don't really need our EC2 instance running 24/7. In fact, many of you would be thinking, why use an EC2 instance and not a Lambda here? Well, the snapshot data stored by ES into S3 is not one single file but rather multiple files (if there is a lot of data) possibly within folders and sub-folders (representing object groupings). Having a Lambda traverse all of those groupings of files, then encrypting and compressing them will involve a fair bit of time, memory, and compute which seems a bit counter intuitive with Lambdas. In order to avoid this, an EC2 instance offers a straightforward approach with less complexity involved. Also, with the introduction of the AWS Instance scheduler we can automate the start of our EC2 instance at a specific time every day, to perform our operations of collating and encryption, unmount our S3 buckets, delete the unencrypted data in our first S3 bucket, remove the snapshot metadata from ES, and stop the instance.
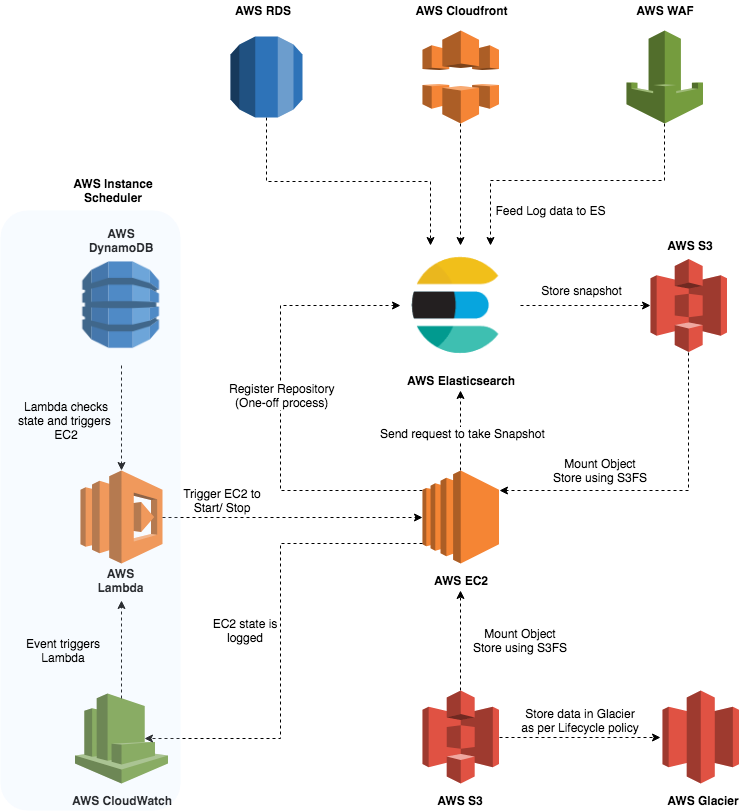
This provides an interesting option to utilise our compute resource in its current form.
Dependency Management
Given that S3FS has dependencies, we need to think about how to maintain this aspect of our build. This leads us to one of two possibilities to manage this:
- We download the latest builds from public repos each time the VM starts so that we retain the latest build for S3FS.
- We maintain a local copy of all dependencies/builds hardbaked (using tools like Packer) or stored locally in our artefact repo and built from there each time. The downside of this would be that we need to provide patches as and when needed for critical updates.
The downside of the first approach is that downloading new versions might pose a risk from a maintenance perspective where different dependencies may be required upon updates to the code base. This may lead to a possible security vulnerability as well requiring constant monitoring. The downside of the second approach is that we need to manually provide patches as and when needed for critical updates.
Given the cons, we would prefer the latter option, especially downloading it from a local repo, because it offer a reduced risk approach as compared to the first option and provides a locked-down stable build for me to use. It does require some effort to patch some updates as necessary but it provides a more reliable way to ensure the continuity of my solution.
Possible Improvements… Steps In Containerisation
Even though using an EC2 instance here is plain and simple, there is a caveat to it when using the Instance Scheduler. The Scheduler can only start and stop existing instances and not re-start Terminated instances, which can be a bit tricky if our workload varies as time passes by, causing our instance to stop before its done processing. This can cause a serious bottleneck for production grade systems and eventually pose a risk to compliance, which we are sure that no one is fond of. In order to avoid this, we can set up checks to verify the completion of the job following which our auto-shutdown process can begin or if we are running containers in our set-up, we can essentially bundle our scripts and deploy it in a container on an orchestration service (like OpenShift, Docker Swarm, or AWS ECS).
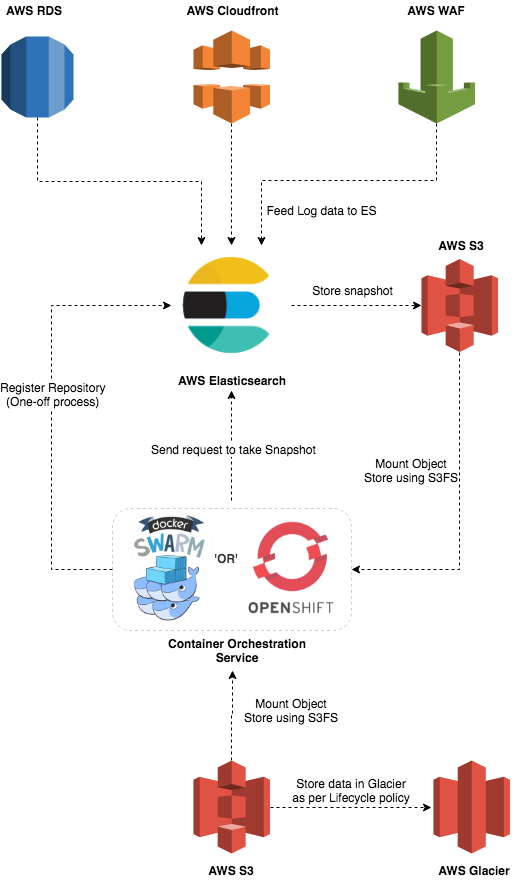
Containerising our scripts will allow us to deploy, manage and delete these containers at a specific time every day, akin to a cron job and run the audit pipeline end to end while reducing the complexity and overall cost of the solution (no more dedicated EC2). Aside from that, it can also guarantee error handling of containers thanks to automated re-deployment thus ensuring that the job is run everyday, and if not, the relevant teams will be notified of the underlying issue behind this.
Conclusion
There are a multitude of architectural patterns out there for data retention based use-cases, with each pattern hosting its own set of pros and cons. However, most of these architectures carry a similar tone to it where any particular component can be replaced with another without breaking the over-arching solution. The logging pipeline discussed here has been iterated over a few times starting from a slightly monolithic approach to a more microservices based integration, which is interesting to see as we deal with different factors and edge cases and cater to them as needed. we are sure there are further improvements that could be made to the solution presented in this article such as adding encryption with signing using AWS Key Management System (KMS), but we will delve into it further in a future article.

